ВУЗ: Не указан
Категория: Не указан
Дисциплина: Не указана
Добавлен: 17.04.2021
Просмотров: 3746
Скачиваний: 3

Introduction to Python for Science, Release 0.9.23
Express
, is completely free to everybody and contains all the libraries you will need for
this manual. The other,
Canopy Basic
, contains nearly every library you are ever likely
to need for scientific computing. It is free to academic users; others pay a fee. Go to
https://www.enthought.com/products/canopy/
and press the “Get Canopy” button, which
will take you to a page where you can either download
Canopy Express
or request and
academic license, which will allow you to download
Canopy Basic
.
Spyder
provides
a
completely
open
source
programming
environment
for
Python.
The entire Spyder distribution is free to all and can be found at
https://code.google.com/p/spyderlib/
. It also includes nearly all the scientific libraries
you are likely to need for scientific computing.
In this manual, we assume you are using Canopy, but the Spyder interface is very similar
to Canopy so that most users should have no difficulty using Spyder with this manual. If
you choose to use Spyder, launch Spyder and then go to the Preferences menu and then
under the
Console
menu, select the
Advanced settings
tab; tick the box
Start
an IPython kernel at startup
(it may already be selected, in which case you
need to do nothing). You only need to do this once, which sets up the IPython console
when Spyder is launched. Once that is done, you should be able to follow everything
written in this manual.
A.2 Testing your installation of Python
Running the Python program below tests your installation of Python to verify that the
installation was successful. In particular, it tests that the NumPy, SciPy, and MatPlotLib
libraries that are needed for this manual are properly installed.
If you are a student, you should input your first and last names inside the single quotes on
lines 15 and 16, respectively.
Instructors can modify lines 21-23 to suit the needs of the course.
1
# This code tests that your Python installation worked.
2
# It generates a png image file that you should e-mail
3
# to the address shown on the plot
4
import
scipy
5
import
numpy
6
import
matplotlib
7
import
matplotlib.pyplot
as
plt
8
import
platform
9
import
socket
10
11
# If you are a student, please fill in your first and last
180
Appendix A. Installing Python

Introduction to Python for Science, Release 0.9.23
12
# names inside the quotes in the two lines below.
Do not
13
# modify anything else in this file
14
15
your_first_name
=
’Dana’
16
your_last_name
=
’Martin’
17
18
# If you are an instructor, modify the next 3 lines.
19
# You do not need to modify anything else in this file.
20
21
classname
=
’Intro Phys I’
22
term
=
’Fall_2013’
# must contain no spaces
23
=
’hmwkemail@univX.edu’
24
25
plt
.
plot([
0
,
1
],
’r’
, [
1
,
0
],
’b’
)
26
plt
.
text(
0.5
,
0.8
,
’{0:s} {1:s}’
.
format(your_first_name, your_last_name),
27
horizontalalignment
=
’center’
,
28
size
=
’x-large’
,
29
bbox
=
dict
(facecolor
=
’purple’
, alpha
=
0.4
))
30
plt
.
text(
0.5
,
0.1
,
31
’{1:s}
\n
scipy {2:s}
\n
numpy {3:s}
\n
matplotlib {4:s}
\n
on {5:s}
\n
{6:s}’
.
format(
32
classname,
33
term,
34
scipy
.
__version__,
35
numpy
.
__version__,
36
matplotlib
.
__version__,
37
platform
.
platform(),
38
socket
.
gethostname()
39
) ,
40
horizontalalignment
=
’center’
41
)
42
filename
=
your_last_name
+
’_’
+
your_first_name
+
’_’
+
term
+
’.png’
43
plt
.
title(
’*** E-mail the saved version of this plot, ***
\n
’
+
44
’"{0:s}" to pine@nyu.edu’
.
format(filename), fontsize
=
12
)
45
plt
.
savefig(filename)
46
plt
.
show()
A.2. Testing your installation of Python
181


Introduction to Python for Science, Release 0.9.23
182
Appendix A. Installing Python

APPENDIX
B
IPYTHON NOTEBOOKS
IPython notebooks are useful for logging your work. Here we suggest that you use them
for logging and turning in homework assignments. You may also find them useful in
other contexts such as laboratory work. The IPython Notebook interface is similar to
Mathematica or Maple.
B.1 An interactive interface
An IPython notebook is a web-based environment for interactive computing. You can
work in this environment interactively just as you would using the IPython shell (the
interactive Python pane shown in the
figure). In addition, you can also
store and run programs in an IPython notebook just like you would from the Code Editor
window (see
). Thus, it would seem that an IPython notebook and the
Canopy environments do essentially the same thing. Up to a point, that is true. In the final
analysis, however, Canopy (or Spyder or some similar Python development environment)
is generally more useful for developing, storing, and running code. An IPython Notebook,
on the other hand, is excellent for logging your work in Python. That is why we suggest
using them for homework assignments. You may well find them useful in other contexts
as well.
B.2 Installing and launching an IPython notebook
If you have installed Canopy, then you have already installed all the software you need to
use IPython notebooks. IPython notbooks are stored in files with a
.ipynb
extension.
To create an IPython notebook, launch the Terminal (Mac) or the Command Prompt (PC)
183
Introduction to Python for Science, Release 0.9.23
application. On the Mac, the Terminal application is found in the Applications/Utilies
folder. On the PC, the Command Prompt application is found under the Start/All Pro-
grams/Accessories menu. Here we will refer the the Terminal or Command Prompt ap-
plications at the System Console. Type
pwd
(Mac) or
chdir
(PC) to determine the
current directory (folder) of the System Console. Type
ls
(Mac) or
dir
(PC) to list all
the files and subdirectories in the current directory. Using the
cd
change directory com-
mand, move the System Console to the directory in which you want to store your IPython
notebook.
At the System Console prompt, type
ipython notebook --pylab inline
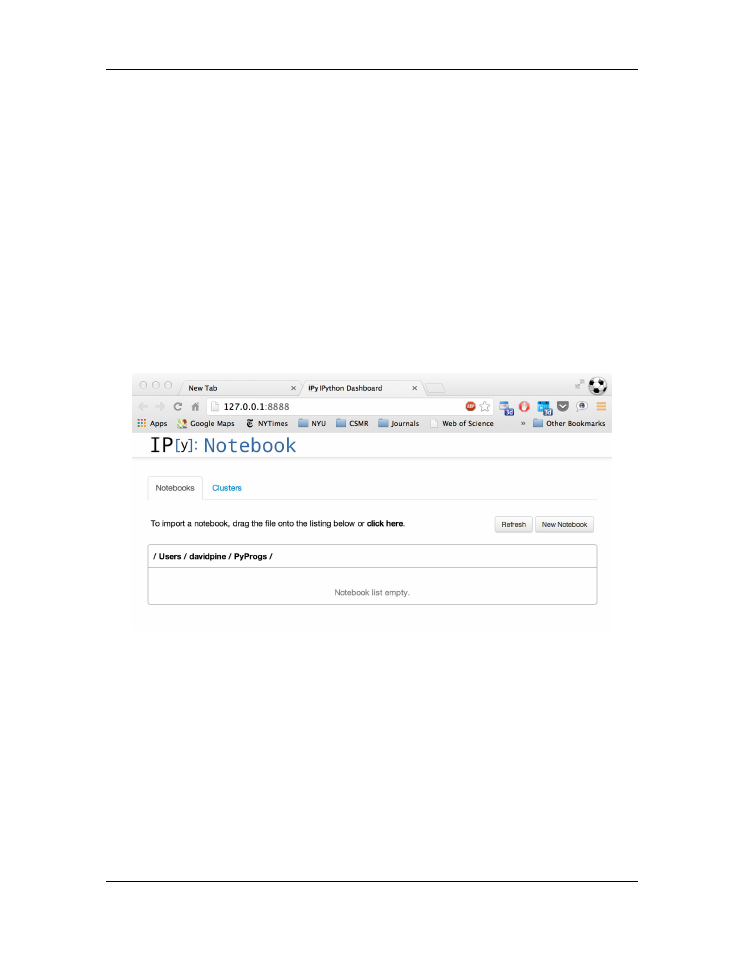
This will launch the IPython notebook web application and will display the
as a page in your default web browser.
Figure B.1: IPython Notebook Dashboard
To create a new IPython notebook, click the
New Notebook
button. That will open
a new
with the provisional title
Untitled0
in a new tab in your
browser. To give the notebook a more meaningful name, click on the
File
menu and se-
lect
Rename...
. Let’s say you rename your notebook
FirstNotebook
. The Name
FirstNotebook
will replace
Untitled0
in your Notebook browser window and
a file named
FirstNotebook.ipynb
will appear in the directory from which you
launched IPython Notebook. That file will contain all the work you do in the IPython
notebook. Next time you launch IPython Notebook from this same directory, all the
184
Appendix B. IPython Notebooks